
This is a simplified variation of the turkey I made two years ago. It produces a really moist bird and a savory stuffing that was well worth repeating. It also has the advantage of roasting in under two hours—true it does not produce a Norman Rockwell turkey, but flavor and convenience over presentation!

Karl’s Deconstructed Stuffed Turkey Updated
Note: The original recipe called for roast/frying the breast whole, before flipping it over using paper towels and adding it to the legs, wings, and stuffing. This was hot, greasy, and hazardous. I knew there had to be a better way. I have also rearrange the order of cooking—for some reason I had started the original recipe with the instructions for making the stuffing, which is actually the last thing you make.
Jan insists that I buy a Kosher turkey every year. While being far more expensive than regular Safeway turkeys, they have two major advantages. The process of Koshering leaves the turkey well brined and more flavorful than other turkeys.
Note: My mother, Claudia, always used Bell’s Poultry Seasoning when she made her Thanksgiving turkey. Some traditions you dont mess with.
This recipe is a variation of a recipe that Julia Child had done with Jacques Pepin in the cooking show they did together in 2000. The idea of breaking apart the bird and laying it over the stuffing gives you far more control over how different parts of the turkey roast and guarantees that the stuffing is completely cooked by the end of the roasting process.
Since I used a Kosher turkey, I did not have to go to the effort of brining the bird. The original recipe called for scattering a few herbs around the meat, but that just does not impart enough flavor in my mind. I used an herb paste under the skin and let it marinate overnight.
The last time I made this recipe, I used an apple, onion, sausage stuffing. I also recalled that this recipe did not produce enough gravy. This year, I bought some extra turkey necks to add to the back and bits left over from breaking down the turkey. This left me with a lot of savory meaty bits—after making the turkey stock—that I used in place of the sausage in the dressing.
To make her gravy, Julia browned the turkey bits in a frying pan to increase the flavor with the Millard reaction. Watching her struggle with this technique reminds me why I do not do it that way anymore—the odd shapes do not lie flat in the pan, it is messy, and you are splattered with the popping grease. I put all of the bits in a roasting pan and broil them for about a half hour, turning frequently, until the pieces are evenly browned all over—no muss, no fuss.
Note: This is actually three recipes in one— the turkey, the gravy, and the stuffing—but they are so intertwined that it would be difficult to make them separately. You could bake the stuffing in a separate casserole, if you wished, but without the juices that drip down from the roasting turkey, it would not be as savory.
A few weeks ago I posted a very long recipe. My wife and daughter suggested that I should break it down into several posts, because the average blog reader dies not like long posts. I posed the recipe as a single post and as 5 shorter posts. I analysed the traffic patterns and either my women are wrong or my readers are above average. Only one person read through the separate posts. Even the ones who started on the broken posts quickly switched to the very long post. This is another extremely long post—12 pages—but the recipe pays off.
After Dinner Note: The turkey, both the light and dark meat, came out moist and tasty. The stuffing was very flavorful. Finally, the gravy came out rich and savory. A perfect holiday center piece.
Karl’s Deconstructed Stuffed Turkey Updated
Ingredients
1 Kosher turkey (12- to 15-pound)
Herb paste
½ cup Irish or European style butter, softened
2 Tbs. Bell’s Poultry Seasoning
½+ tsp. Kosher salt, separate uses
1 tsp. black pepper, cracked
Turkey Stock/Gravy
1-3 turkey necks (extra necks optional)
back and bones after deconstructing the turkey
1 Tbs. vegetable oil (butter or turkey fat)
½ large yellow onion
2 ribs celery, coarsely chopped
1 small carrot, coarsely chopped
2 cloves garlic, whole
½ tsp. Kosher salt
½ Tbs. Bell’s Poultry Seasoning
32 oz. commercial turkey broth, separate uses (optional)
4-5 Tbs. AP flour
½ cup milk or cream
Stuffing
1 sweet French baguette
1 sour dough French baguette
1½ Tbs. Bell’s Poultry Seasoning
2 Tbs. vegetable oil (butter or turkey fat)
1 large yellow onion, coarsely chopped
3 celery ribs, coarsely chopped
½ tsp. Kosher salt
½ tsp. black pepper, cracked
1 cup shredded turkey (recovered from the meaty bits during making the turkey stock)
1 Granny Smith apple, cored, peeled, and coarsely chopped
½ cup pecans
3 large eggs, beaten
2 cups commercial turkey broth (or 1 cup homemade stock and 1 cup water)
Directions
Note: While you may do this all in one day—if you start early—it is easier to season the turkey and to make the turkey stock the day before.
The Turkey
1. Soften some butter and mix in the Bell’s Poultry Seasoning, half a teaspoon of salt, and the pepper and set it aside.
Tip: You do not want the butter to melt, but do not put it in the refrigerator or it will harden. You want it to be an easily spreadable paste.
2. Remove the neck and any giblets.
3. Cut the neck into pieces and put it in a large roasting pan.
Tip: Lining the pan with aluminum foil makes the clean up easier.
Note: Discard the liver—or save it for another dish—but if your bird comes with the gizzard or heart add them to the pan. If you are using extra necks cut them into pieces and add them to the pan. Kosher turkeys usually come with the necks only.
4. Remove any large lumps of fat from around the neck and tail cavities of the bird.
Tip: You may render these lumps of fat for turkey smaltz for another recipe, but here it would simply make your gravy greasy.
5. With the turkey breast side up, use a boning knife, paring knife or kitchen shears, cut through skin around leg quarter where it attaches to breast.
6. Turn the bird over and use a sharp knife to separate the “pearl” of meat where the front of the thigh meets the backbone and cut the thigh meat from the back bone up to the hip joint.
7. Bend the leg back to pop leg bone out of socket.
Tip: The Julia Child video shows the proper way of doing this. If you hold the thigh up-right and pull it away from the carcass nothing will happen, because the joint is locked in place. Jacques Pepin pulls the “knee” of the thigh up towards the wing and pulls out and towards the tail—this unlocks the joint and makes it easy to disjoint the thigh.
8. Cut the tendon and pull the leg portion away from the carcass.
Tip: Repeat for the second leg.
9. For each leg, starting with the skin side down, use a knife to separate the bone from the thigh meat.
10. Cut along the thigh bone and scrape the meat from the bone, until you reach the knee.
11. Being careful not to cut the skin, disjoint the knee and cut the tendon to remove the bone.
Tip: Add these bones to the roasting pan with the neck(s).
Note: You will be left with the leg attached to a boneless thigh. This will make it much easier to get nice clean slices of thigh meat, when you carve the turkey.
12. Using a knife and your hands, free the skin from the thigh and pull it all the way down to the bottom of the leg.
Tip: Ideally, you want to leave the skin attached along the top of the thigh, where it met the backbone and at the bottom of the leg. Do not pull the skin free of the leg! After you season the meat, you will be pulling the skin back over the leg and thigh
Note: One side of each leg will have some thick tendons just under the surface. Use a paring knife to punch a few holes through the tendons to let the seasoning into the meat.
13. Using about a third of the herb paste, rub the legs and thighs all over with the seasonings.
Tip: Be sure to get plenty of the paste in the gap were the thigh bone was.
14. Pull the skin back over the meat and tie the thighs closed with two pieces of string per thigh.
Tip: Last time, I rubbed a bit of the herb paste over the outside of the leg quarters skin. Some recipes, I have read, suggests that this prevents you from getting a crisp skin and that this paste might burn during roasting. This year, I mostly left the skin dry.
Note: Once the skin has been pulled over the thigh you may chop off the bone end of the leg, if you wish—if your roasting pan is tight this will save a few inches. It will also allow you to remove the tough tendons in the leg after it is fully roasted (see the Julia Child video).
15. Place leg quarters in a 12 x 14 inch pan.
16. Lay the remaining turkey carcass breast side down.
17. Using kitchen shears—and starting from the tail—cut along both sides of the backbone to remove it entirely.
Tip: Cut the back into pieces and add it to the pan with the neck(s).
Note: Do the following steps for each side of the breast.
18. Lay the breast skin side down and, using a sharp knife, separate the ribs from the breast meat, from the pointed end up toward the front of the bird.
19. Using your hands, bend the ribs away from breast to pop the scapula bone out of its socket.
20. Cut through tendons to separate the bones from breast.
Tip: Add the ribs and scapulii to the roasting pan.
Note: There is a second larger bone—the coracoid—that is attached to the wing joint, you will be leaving this bone in place at this time.
21. Cut the skin around the wings and twist to pop the bone out of the joint.
22. Use a knife or shears to cut the tendons and free the wings from the breast.
Note: I cut off the wing tip—the pointy end, mostly skin and very little meat—and add it to the roasting pan.
23. Separate the skin from the breast—leaving it attached at the line of the breast bone—and spread half of the remaining herb paste under the skin.
24. Pull the skin back over to cover the meat.
25. Spread the remaining herb paste over the underside of the breast.
Tip: While you are marinating the breasts, it is easiest to leave them in one piece. Before roasting you will separate them along the breast bone.
26. Place the breast and wings in the pan with the legs.
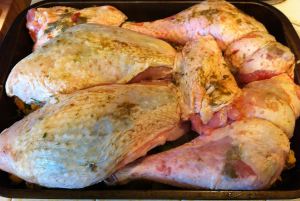
Karl’s Deconstructed Stuffed Turkey Updated
Ready for the oven
Tip: The sides with the most skin should be up.
27. Cover the pieces with a clean kitchen towel and refrigerate for at least 4 hours.
Tip: Overnight is better.
Note: Besides marinating the meat with the spice paste, part of this resting is to completely dry out the skin, so that it crisps nicely. Many of the TV chefs leave their poultry in the refrigerator uncovered. They, of course, have empty refrigerators dedicated to this purpose. A plastic wrap would prevent this drying, so using a kitchen towel seems like a good compromise.
The Turkey Stock
28. Place the roasting pan with the neck(s), back, and bits on the middle rack of the oven and turn on the broiling element on high.
29. Broil the turkey bits for 30-40 minutes.
Tip: Turn the pieces as needed to brown all sides and to prevent burning.
Note: If any of the bits gets badly burned, discard that piece.
30. While the bone are broiling, add one tablespoon of oil to a large soup pot, over a medium high heat.
31. Sauté the onions, celery, carrots, and garlic with the salt, until just starting to pick up some color.
Tip: Add a cup of liquid if you need to prevent the vegetables from burning, while you wait for the bones to finish browning.
Note: This is your gravy base. You will eventually be adding 5-6 cups of liquid. You can use water or you may give it a flavor boost by making some or all of that liquid using turkey or chicken broth. If you like a lot of gravy, you may add more commercial broth, wine, or water.
32. Transfer to roasted bones and bits to the soup pot and add some boiling water to the roasting pan.
33. Scrap up any fond in the pan and pour it through a fine meshed sieve into the soup pot.
Tip: You want to recover the flavorful fond from the pan, but you do not want to add the coagulated scum to your stock.
Note: Scum is the common name for the lipoproteins that cooking meats release. While it is edible, it will make your stock cloudy and grainy.
34. Add a total of 5-6 cups of liquid to the pot and sprinkle the Bell’s Poultry Seasoning over the contents of the pot.
Tip: See note above step 31.
35. Bring the pot to a boil, reduce the heat, cover, and simmer for one hour.
Tip: You may also add some fresh herbs and/or more vegetables to the pot, if you wish.
36. Remove the meatier bones from the pot and let them cool slightly.
37. Strip most of the meat from the bones and return the bones to the pot.
Tip: There is a lot of good meat some of these bones—especially on the neck bones—that you do not want to cook to death.
Note: Reserve this meat to add to the stuffing later.
38. Continue simmer the turkey bits until the liquid is reduced by half, about another two hours.
Tip: At this point you should have around three cups of turkey stock.
Note: If you are a bit shy and you are also using turkey broth you may make up the difference with commercial broth.
39. Strain the solids out of the stock through a sieve and reserve.
Tip: If you wish you may press any of the cooked vegetables through the sieve and recover and reserve any bits of meat that remain on the bones to add to the gravy.
40. Put the turkey stock in a cover-able container and refrigerate.
The Stuffing
41. Cut the baguettes into ½-inch cubes and toast them on a baking sheet in a 300º F oven for 20-30 minutes, until dry and just starting to brown.
Tip: Stir the bread cubes half way through so that they brown evenly.
Note: Toss any bread cubes that are over done.
42. Transfer the bread cubes to a large mixing bowl.
43. Sprinkle the Bell’s Poultry Seasoning over the bread and toss to distribute.
Tip: I have tried brushing bread slices with oil and sprinkling on the seasoning on before baking, but the powdered season mix spreads more evenly if you add it to the bread while the bread is dry.
44. Add some oil to a large pan and sauté the onions and celery with the salt until just translucent.
Tip: You may use butter, vegetable oil or you can skim off some of the turkey grease that rises to the top of your reserved stock.
45. Sprinkle the black pepper over the vegetables and add the reserved turkey meat from making the stock.
46. Stir in one cup of liquid into the pan and remove it from the heat.
Tip: Again, this can be water, commercial turkey or chicken broth.
Note: For an extra boost of flavor, you may use some of the turkey stock you have just made, but you will want to save most of it for the gravy.
47. Add the apple pieces and pecans to the bread cubes in the large mixing bowl.
48. Put the eggs in a two-cup measuring cup and beat them well.
49. Mix another cup of liquid into the eggs.
Tip: Here you may use commercial broth mixed with half a cup of white wine or sherry.
50. Pour the egg mixture and the contents of the pan over the bread cubes.
Tip: Use a spatula to scrape out all of the “good stuff” from the pan and measuring cup.
51. Toss the bread to distribute the ingredients.
Tip: The mixing bowl may be very full at this time, toss the ingredients very carefully—as they will want to fall out of the bowl as you toss them.
Note: The stuffing may seem a bit dry. However, as the turkey releases its juices the stuffing will become quite moist during the roasting time.
Roasting the Turkey
52. About 30 minutes before you are ready to put the bird in the oven, pre-heat it to 450º F.
53. About 3½ hours before dinner, remove the turkey from the refrigerator and set it on the counter to come to room temperature.
Tip: A room temperature bird will cook more evenly that a refrigerator cold turkey.
54. Feel along the neck edge of the breast for the wish bone—the furcula.
55. Damaging the meat as little as you can cut along the wish bone remove it.
Tip: If you get the wishbone out intact, you may set it in the roasting pan to cook. It would then be available for the traditional breaking of the wishbone.
Note: The wishbone will most likely be fully cooked after the first half hour. Remove it when you remove the aluminum foil (see the note below step 66).
56. Divide the breasts in two by slicing down along one side of the breast bone.
Tip: Slicing through the meat will be fairly easy, but it gets a bit difficult when you try to cut through the bone and cartilage at the bottom. a very heavy knife or cleaver is useful for this.
Note: You will end up with one breast that is slightly larger than the other—the side with the breast bone. Do not be concerned.
57. Pam a large roasting pan.
Tip: I have a very large roasting pan (12 x 18 inch with a wire rack) that I bought just to roast turkeys. For this recipe I remove the rack and use just the pan.
58. Transfer all of the stuffing to the roasting pan and pat it flat.
59. Place both breast halves—skin side up—with the thickest parts near one of the short sides.
60. Arrange both leg quarters—again with the side with the most skin facingup—over the other end of the stuffing.
61. Fit the wings in where ever there is enough space left in the pan.
62. Push any stuffing along the edges under the meat, so most of stuffing is covered by turkey.
Tip: Exposed stuffing tends to get overdone and dry out during the long roasting time.
63. Lightly season breast and leg quarters skin with salt.
64. Lay a sheet of aluminum foil lightly over the breasts.
Tip: This prevents the breasts from overcooking, while the legs—which take longer to cook—get a jump start.
65. Put the roasting pan into the oven and roast for 30 minutes at 425º F.
66. Reduce oven temperature to 350º F and insert a constant read thermometer into the thickest part of the breast, near the wing joint.
Tip: Set the thermometer alarm to 160º F.
Note: Remove the foil covering the breasts.
67. Roast for another 30 minutes and then rotate the pan.
Note: The back of the oven is always hotter than the front. Rotating the pan compensates for this temperature differential.
68. Continue roasting until the thermometer alarm goes off—another 45-70 minutes.
Tip: The time is dependent on the exact size of your turkey and the exact temperature of your oven.
Note: I was cooking my sweet potatoes during the last half hour of roasting the turkey. I had positioned the lower oven rack to have enough space to fit a low casserole dish.

Karl.s Deconstructed Stuffed Turkey Updated
Hot from the oven
Making the Gravy
69. Put the remaining turkey stock in a medium pan.
Tip: If you are controlling your fat intake, scrape much of the turkey fat that has congealed on top of the stock.
Note: You may use some of this to sauté the vegetables in making your stuffing.
70. Take any remaining meat leftover from making the stock and chop them finely.
Tip: Discard the any bones, skin, or gristle.
71. Add the meat to the gravy pot and bring it to a simmer.
72. When the alarm rings for the turkey, remove the pan from the oven and tent the bird with aluminum foil.
Tip: Do not forget to turn the oven off.
Note: I had my sweet potatoes in the oven and at this point, so I left the oven on. I also added my Brussels sprouts to the oven to roast for 20-30 minutes.
73. Let the turkey rest for 20-30 minutes.
Tip: This rest gives the turkey juices a chance to distribute evenly throughout the meat.
Note: While the turkey is resting, finish making the gravy
74. Put the flour and milk in a small, lidded jar and shake well.
Tip: Some recipes called for making a roux with butter and flour in the gravy pot before adding the stock. With several cups of stock to thicken, this would be a great deal of added fat. You may prefer this, but Jan’s diet does not allow for it.
75. Remove the gravy pot from the direct heat and pour the flour mixture through a strainer into the gravy pot, stirring constantly.
Tip: The strainer removes any unmixed clumps of flour and prevents a “lumpy” gravy.
76. Return the pot to the heat and cook, stirring occasionally until the gravy has thickened, about 3-5 minutes.
77. Keep warm until ready to serve.
Carving the Turkey
Note: This recipe does not lend itself to a fancy carving ceremony at the table. I prefer to carve the turkey into decent portions in the kitchen and then to present them artfully arraigned on the serving plate, with the stuffing on the side.
Alternative presentation. Mound the stuffing on a large platter and set the breasts on top of the stuffing. Place the legs in position as if they were still attached. Carve and serve at the table.
78. Transfer the breast, legs, and wing to a cutting board.
79. Check the seasoning of the stuffing and, if necessary, add salt and pepper to taste.
Tip: If you feel the stuffing might be getting cool, toss it—so that the stuffing on the bottom does not burn—and return the turkey pan to the cooling oven.
80. Lay the leg on the cutting board with the skin side up.
81. Remove the bits of string that were holding it together.
82. Slice the thigh, crosswise, into three or four slices and arrange them on a platter.
83. Holding the leg by the thickest part, slide your knife under the thick tendons at the bottom of the leg.
84. Cutting away from you, free these tendons from the bottom of the leg.
85. Take the leg by the bone end and reverse your knife.
86. Slice away about a third of the leg meat from the bone.
Tip: Again cutting away from you.
87. Rotate the leg and repeat this process cutting away a second third of the leg meat.
88. Transfer the leg bone to the platter and reassemble the leg slices around the bone—as if they were still attached.
89. Turn the breast skin side down on the cutting board and use a knife to remove any remaining bones.
Note: These will be breast bone and the coracoid.
90. Turn the breast over and slice the breast into portions crosswise.
Tip: I like to make ¾ inch slices, each with its own bit of crisp skin.
91. Reassemble the breast on the serving platter.
92. Cut the wing flat free of the drumette and arrange them on the serving platter.
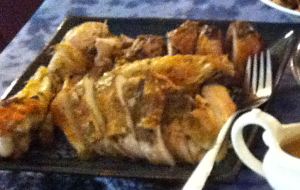
Karl’s Deconstructed Stuffed Turkey Updated
Carved for the table
93. Serve warm.
Tip: You may garnish the platter with parsley
Note: For five people I carved only half of the turkey, but the carving is the same for each half. For a larger crowd, carve both halves.
94. Transfer the stuffing to a bowl and the gravy to a gravy boat and serve them on the side.
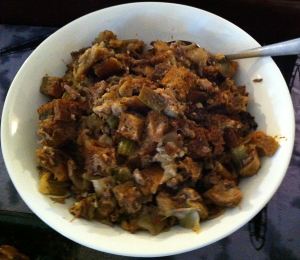
Thanksgiving Stuffing

Pingback: Karl’s Chicken Stock | Jabberwocky Stew
Pingback: Karl’s Deconstructed Stuffed Chicken | Jabberwocky Stew
Pingback: Karl’s Mandarin Sweet Potatoes | Jabberwocky Stew
Pingback: Karl’s Deconstructed Stuffed Turkey without Onions | Jabberwocky Stew