
Sunday, I made New Zealand venison hand-pies, they were very popular. One of the recipes wife Jan really likes is Volga German bierock—savory beef, onions and cabbage in a raised dough bun. She asked me to make them using the shortcrust pastry I learned to use for the NZ pies.

Karl’s a Bierock and a NZ Pie Walk into a Bar
When I made the hand pies I use a folded dough technique—think calzone—because I did not have the specialized pie pans that they use in New Zealand. Looking a family recipes—0posted on the internet—I discovered that many NZ home cooks don’t use them either. A muffin tin works quite well as a small pie pan. I went out and bought a extra-large muffin tin for this purpose.
Karl’s a Bierock and a NZ Pie Walk into a Bar
Ingredients
Crust
12 oz. butter, unsalted (1½ sticks)
3 large eggs, separate uses
½ cup full fat sour cream
2 ½ cups AP flour
1 tsp. Kosher salt
Filling
2 Tbs. ghee (clarified butter)
1½ cup yellow onion, finely diced
1½ cup cabbage, finely sliced and roughly chopped
1 bay leaf
¼ tsp. Kosher salt
6 cloves garlic, minced
¼ cup AP flour
1 lb. ground Beef
½ cup water
2 Tbs. Beef Better than Bouillon, reduced sodium
1 Tbs. fresh thyme
1 tsp. marjoram
1 cup. dry white wine
½ tsp. black pepper, cracked
Directions
Crust
Note: Crust dough may be made up to two days ahead of time.
1. Put the butter in the freezer for 30 minutes to an hour.
Tip: You will be using a box grater to mix the butter into the flour.
Note: While you want the butter very cold, you do not want it frozen solid, as that makes it difficult to grate.
2. Scramble two of the egg in a small bowl and then whisk in the sour cream.
Tip: It is important to use full fat sour cream. The fats in the egg yolks and sour cream bind with the flour to prevent the formation of too much gluten.
Note: I usually use a variation of French pastry for much of my baking. The English technique is to work the butter into the flour to melt and bind up its gluten forming properties. I chop the butter into fine discreet cold bits. When these bits of butter melt during baking they create little pockets of steam that create the crusts flaky texture and provide some “lift” in a pastry that does not have other leavening. The fats in the wet ingredients substitute for some of the butter to bind to the flour and to prevent too much gluten formation and a tough crust.
3. Put the flour and salt into a medium bowl and mix well.
Tip: Sifting the flour and salt together several times works well.
4. Mix the wet ingredients into flour.
5. When most of the dry flour has been incorporated, turn the dough out onto a work surface.
Tip: I bought a pastry marble at a yard sale that is probably the best buy I have ever made.
Note: The cold marble prevents the butter from melting and the smooth surface prevents the dough from sticking too much.
6. Using well floured hands and a board scraper, work the rest of the flour into the dough ball.
7. Knead the dough for 1-2 minutes.
Tip: You want to ensure that the dough is fully mixed, but not so much that you get too much gluten formation.
8. Divide the dough in half and roll each half into a 12 inch snake.
Tip: I am making six pies in a large muffin tin. You may use a smaller regular sized muffin tin, if you wish. Divide your dough for the number of top and bottom crusts you will need accordingly.
Note: I had made a double batch of short crust for my hand pies. This was enough dough to make 16 thin crusted pies. I am planning to make six larger pies with a lot of filling. I am planning a much more thick crust with top crusts to be strong enough to hold everything in. If I divided the dough after I had chilling it would be very difficult to work with. I decided to divide the dough when it was still soft and chill each ball of dough separately. That way they would be ready to use right out of the refrigerator.
9. Divide the first dough snake into 4 even pieces.
Tip: These are for four bottom crusts. Cut the snake in half and set the halves side by side. Cut the halve in half again.
Note: Roll each piece of dough into a ball. Each ball should be about the 2 inches. At this point, you may take a pinch out of any ball that is a bit large and work it into any smaller ball.
10. Divide the second dough snake into two even pieces.
11. Divide one half of the snake in half and the second half into six equal pieces.
Tip: Two more bottom crusts and six top crusts.
12. Wrap the balls in plastic wrap and refrigerate for at least one hour.
Tip: You may prepare your crusts up to two days in advance.
Note: You do not want the balls to dry out while they are chilling, but wrapping each ball separately would be a waste. Solution: set out a small tray and lay down a sheet of plastic wrap. Place several balls in a row—you do not want the balls to touch and stick together. Pull the edge of the plastic wrap over the balls. Lay down a second row of balls and pull the far edge of the wrap over the second row if balls. Twist the ends of the package and flip the package over, so that the open seam is face down and tuck the ends under to keep them from untwisting.
Filling
13. Melt the ghee in a large sauté pan over medium heat and add the onions, cabbage, bay leaf, and salt.
14. Sauté the vegetables until soft and the onions are starting to pick up some browning, about 5-6 minutes.
15. Pull the vegetables to the sides of the pan and sauté the garlic in the hole in the center of the pan.
16. Mix the garlic into the vegetables and sprinkle the flour into the pan.
17. Sauté the flour and vegetables for another 3-4 minutes.
Tip: You are making a rough roux cooking the flour in the fat coating the vegetables.
Note: You want to cook off the raw flavor of the flour.
18. Transfer the vegetables to a bowl.
19. Form the beef into a single large patty and fry it until well browned on both sides.
Tip: This is a America’s Test Kitchen trick to get the flavor of the Maillard reaction without turning all of your meat into dried out rocks.
20. Transfer the beef patty to a plate to cool.
Tip: When the meat is cool enough to handle break it into small bits.
21. Deglaze the pan with the water and return the vegetables to the pan.
22. Stir in the bouillon, thyme, marjoram, and white wine.
23. Return the meat to the pan.
24. Stir in the black pepper and simmer until the gravy has thickened.
Tip: This is the tricky bit. You want your gravy to be thick enough, so that it is not runny, but you do not want it to be too dry either.
25. Remove the pan from the heat and let the stew cool.
Tip: The gravy does not need to be stone cold, but you want it cool enough that it does not start cooking your crust on contact.
Assembly
Note: Preheat the oven to 350º F about 10 minutes before you are ready to bake the pies.
26. Put the last egg into a small bowl, scramble it well, and reserve it for later.
27. Remove several of the large dough balls from the refrigerator and flatten them with your palm into 3 inch disks on a well floured board.
Tip: You want enough flour that the dough does not stick as you roll it out. You also want to flour your rolling pin as well. I use a tapered 9 inch jiaozi rolling pin that is perfect for rolling out small, thin disks—it is half the size of a French style rolling pin. I bought mine in China, but I was unable to find them online.
Note: Keep the remaining dough balls in the refrigerator until you are ready to use them.
28. One at a time, roll the dough pieces out into 7 inch disks.
29. Gently press the dough sheet into the muffin cup.
Tip: There should be about half an inch of the crust over lapping the top of the muffin cup. The excess dough inside will crumple around the sides of the muffin cup. Try to get the folds to be neat and attractive—although it will not really matter, any errors will be hidden inside the pie.
Note: It is not necessary to grease or flour the muffin cups. There is enough butter in the crust to self-grease the pan.
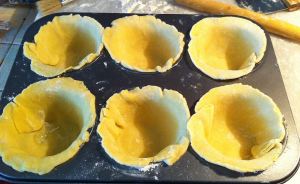
bottom crusts
30. Fill the bottom crust with the stew to about ¼ inch of the top of the cup.
Tip: I found that with the large muffin cups there was just enough stew to fill all of the cups.
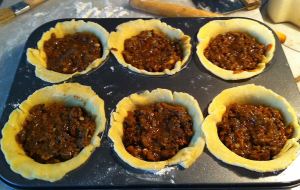
Filled pies
31. Continue rolling the bottom crusts and filling the pies.
32. When the pies are all filled, roll out the top crusts to about 2½ inches.
Tip: When laid over the overlap of the bottom crust the edges should just line up.
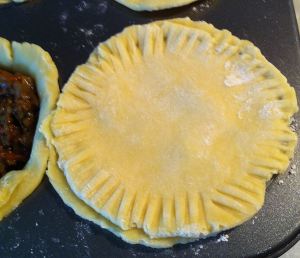
crimping the top crust
33. Use the tines of a fork to press the edges together.
34. Working around the top of the pie, fold the edges of the crust down in between the muffin cup and the bottom crust.
Tip: This process will leave a puffed up top to the pie and about a quarter inch gap around the edge of the pie. Press gently down on the top of the pie to fill in this gap.
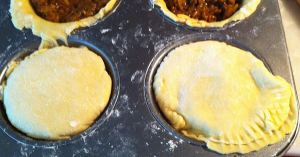
tucking in the edges
35. Brush the tops of the pies with the egg wash.
36. Bake at 350º F for 40-50 minutes, until golden brown.
Tip: Rotate the pan half way through to ensure even baking.
Note: The stew is already completely cooked, but the thick crust takes time to bake—you do not want a soggy, underdone crust.
37. Remove the pies from the muffin tin and transfer them to a wire rack to cool for a few minutes.
38. Serve warm.
